Digging In the Dashboard, Part II: Features for Longform Posts
As we discussed in the first installment of Digging in the Dashboard, WordPress.com has so many great features that it’s tough to be familiar with them all. I’m still discovering new ones myself! Let’s keep the discovery going with three more features that might be new to you.
This time, we’ll cover three features that can help you break up and organize longer posts, so that they display more cleanly and are easier for your readers to digest. Many of you might be ratcheting up your word count in anticipation of NaBloPoMo (National Blog Posting Month) and NaNoWriMo (National Novel Writing Month), so we hope these tips come in handy!
Pagination
Longform posts are all the rage these days. We want content, and more of it! But sometimes long, uninterrupted blocks of text can overwhelm your readers. If you sometimes have posts that run on for paragraphs, consider paginating them, to limit the amount of text shown on each screen (example here).
To paginate a post, all you need to do is insert the following tag in the Text editor wherever you want a page break to appear:
<!--nextpage-->
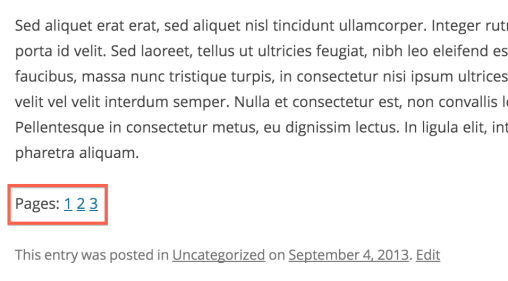
Your post will be divided into multiple pages, with page navigation appearing at the bottom or top like so:

The pagination will appear at the bottom or top of the post on your blog’s homepage, and also on the individual post page.
Page Jumps
Another way to help your readers navigate long posts is to add some headings and provide links to each heading at the top of the post. You can do this with Page Jumps.
For example, say you wrote a post for your users with instructions for how to use, oh, I don’t know, page jumps. Here’s how you might go about it:
Step 1: Break up your text with headings.
Step 2: Create links to those headings at the top of your post.
Step 3: Add a unique identifier for each link.
Step 4: Add an anchor where each link should “jump.”
Step 1: First, you’ll want to add headings to each section of text. You can do that by bolding or underlining a section of text, or by using one of the preformatted heading texts in the Styles dropdown menu of the Visual Editor. For my example, I’ve bolded the Step X bit of each of my steps.
Step 2: Create links to those headings at the top of your post. This gives your readers something to click on to skip to the section of your post they’re most interested in. I’ve provided italicized links above to each of the steps in this set of instructions.
Step 3: For each of the links you’re providing at the top, you’ll need to a “unique identifier” similar to the following in the Text editor:
<a href="https://wordpress.com/blog/2013/09/27/splitting-content/?like_comment=183952&_wpnonce=6f733953e5#step1">Step 1: Break up your text with headings.</a>
I’ve used #step1, #step2, etc. as my unique identifiers for the above steps, but you can use any identifiers you like, as long as each is different. The text included where “Step 1” is above should be the specific text that you want to be clickable.
Step 4: Still in your Text editor, add an “anchor” similar to the following for each heading:
<a id="step1">Step 1</a>
The bit in quotations should match the unique identifier you created for each link.
Now that I’ve done that, if you click on my Step 1 link at the top of this section, you’ll be jumped to the associated Step 1 heading, and so on.
This set of instructions is a specific example of one way page jumps can be useful, but you can also use them to create footnotes, to link readers back to the top of your page, and even to link readers to a specific point on another page or post. To see what Page Jumps look like in the wild, check out this Learn.WordPress.com page.
The More Tag
Finally, you might have noticed that some themes here at WordPress.com don’t show the entire post on the homepage. They show an excerpt with some sort of “Read More” link to the full post. If you like this style, but you don’t have a theme that does this, you can still divide your posts this way using the More tag (we use the More tag on The Daily Post).
Wherever you’d like the excerpt to stop, add the following in the Text editor:
<!--more-->
Or put your cursor where you’d like the break to be in the Visual editor and click the “Insert More Tag” button:

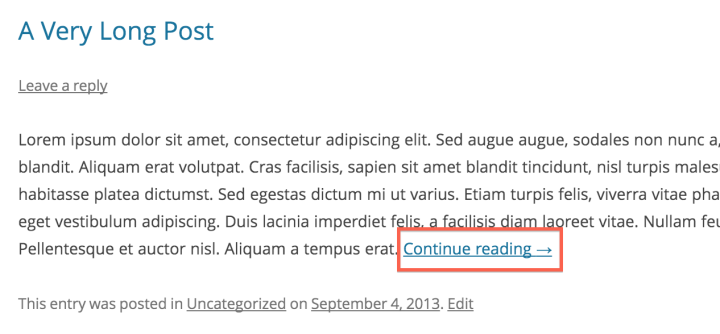
Where the tag is inserted, a link will appear on your homepage:

The text “Continue reading” is used by default, but you can customize it by modifying the tag:
<!--more Read on!-->
Next time you have a lengthy post, try one of these tricks for splitting your content! Your readers will thank you.
You might also enjoy these related posts:
- Digging in the Dashboard: Three Features to Discover
- Publish, Promote, Repeat: Dashboard Tools to Share Your Stuff with the World
- Longform Layout: Keep Readers Hooked ’til the End
- September 27, 2013
- Features, HowTo, Posting, WordPress.com, Writing
Thank you. Really useful information!!
LikeLike
I’ve been blogging for years and I did not know it was this easy! Thank you!
LikeLike
Great guidelines! Thanks!!
LikeLike
I just started using the “more tag”, it works like a charm. Thanks
LikeLike
Cool!! Thanks WP!!
LikeLike
Thank you. This information will help me a lot with my new posts to come.
LikeLike
Wow! Didn´t know that this is possible!
LikeLike
It’s great! Thanks for taking your time to explain all these.
LikeLike
Elizabeth, I need to do this and you wrote a good article on it but I still can’t for the life of me figure out how to do this. Could you help me please? Thanks in advance. You guys are totally awesome! Gracie Lynne
LikeLike
Thanks, I needed this!
LikeLike
I wondered whether it would work on a self-hosted WP site, thinking perhaps there would be a different in the code or something. So I tried it and it works and it’s really good to know.
Thank you.
LikeLike
I meant the ‘next page’ code…
LikeLike
Thanks it helps. I was using the ‘continue reading’ tag so far & good to know that I can also use pagination & page jumps. Very useful info.
LikeLike
I have been blogging for a year and half with mostly longform content, and I had no idea about pagination and page jumps. Very useful tips, thanks.
LikeLike
Thank you for using my post as the example for “Pagination”. I’m am quite shocked and humbled by the amount of views received. It’s a wonderful blogging tool!
LikeLike
I like it! It will work perfectly when I post copies of some family memoirs.
LikeLike
Thank you! Just what I needed to know. Off to put some things into action =)
LikeLike
I didn’t know about these until now. Thanks for writing this post. I’ll try them out…just wondering whether you need to switch to html to insert these tags?
LikeLike
Although I totally love the information that this series of posts provide, this one drives me CRAZY! Why does one page scare peeps? Why would anyone WANT to flip through several pages to read one story? Then when you’re finished, one would have to “go back” however many pages to get back to the index. Or if you’re a fast reader like me, it’s a PAIN to wait for the next page to load. I’m not on dial up, but still takes time. I also judge posts by how much content is in them, if I am looking for information and I only see a short paragraph, (perhaps not noticing the multiple pages), I’m out of there and on to the next post. Is it perhaps one would get more clicks on their post in their stats by doing this? I understand this may be helpful to know, BUT, I truly don’t understand why this would be good advice.
LikeLike
Terrific options that help both bloggers and readers. Thanks for pointing them out – and explaining how to utilize them.
LikeLike
Mmm, I didn’t know about that pagination stuff. Will surely come in handy when I go mad expounding about a favourite computer game.
LikeLike
This is awesome information! Thank you!
LikeLike
Midwestern Plant Girl,
I could definitely see people being intimidated by an enormous wall of text that keeps going as one scrolls and scrolls. Breaking it up might give people a chance to immerse themselves into the content. Hopefully if they’re sufficiently engaged, they will want to read on. Lots of longer articles online use this format.
I’m not sure about the click thing. That’s a good question, actually. I hope they don’t count as separate views, as that would be a little disingenuous imo, but I think they do.
LikeLike
Thank you for this excellent information. In particular about the page jumps. I had no idea how to insert them. Brilliant!
LikeLike
Reblogged this on Sally Ember, Ed.D. and commented:
Very useful for newbies like me or even self-taught bloggers who just never got these memos! Follow this blog!
LikeLike
The page jumps are stellar! I tried them on my most recent post, and they definitely make navigation easier, especially if someone is looking for a specific part of the post. One thing that I found helpful is putting the anchor ABOVE the heading rather than surrounding it as suggested. Thus instead of:
Step 1 (or other suitable heading text)
You get:
[last line of text from the preceding paragraph]
Step 1 (or other suitable heading text)
The reason for this is the anchor will cause a jump to the line below it. If you place the anchor around the heading to which it points, the page jump takes a reader to the line below the heading, not the heading itself. At least that’s what happened for me using Internet Explorer 10.0.09
LikeLike
Thank you! I was trying to figure out how to do this. This will be so much better. A million thanks!!!
LikeLike
Wow this is great!! Can’t wait to try these out!
LikeLike
Thanks so much for the help! Great tips and the visuals are marvelous.
LikeLike
It’s really useful. Thanks so much!
LikeLike
Hey good stuff in here!! Thanks for posting this. I had no idea about the pagination…super helpful…I want to write a long post just to try it! 🙂
http://5thPhotographyBlog.com
LikeLike
The described solutions are for “Posts” only, is there a solution for “Pages”?
LikeLike
Oh thank you, this is exactly what I needed to know and just when I needed it!!
LikeLike